Amigurumi Christmas Ornement Noel Free Pattern
Hello dear Amigurumi enthusiasts! Today I would like to share with you a free Amigurumi Free Pattern pattern and construction instructions. Amigurumi has become a popular hobby in the world of craftsmanship, and in this article I will present you a great Amigurumi Free Pattern design. Trust your imagination while doing amigurumi. And dare to create your own unique designs. Welcome to the Amigurumi world, enjoy fun handicraft projects.
Hello amigurumi lovers and beautiful visitors, I wanted to share the free amigurumi patterns for you here. In my article I will share 1 pattern and how to make it for you.
Materials
• 2.00 mm crochet hook
• Colors of Alize cotton gold threads: (062) off-white, (382) pastel pink and (056) red.
• Schachenmayr catania yarn color: (162) coffee
• Fiber filling
• Stitch marker
• Needle
• Wooden stick to help fill and shape the amigurumi
• Pins
• 1 button
• 1 mini pompom
Skill Level: Easy
Size: 11 cm (4.33 in) tall
Abbreviations
(sc)/(sc): single crochet
(bo): popcorn stitch
(ml)/(ch): chain, air stitch
(MR): magic ring
(dim)/(dec): decrease, decrease, decrease
(increase )/(inc): increase
(M)/(st): Stitch (st) stitch
(FLO): work only in front loops
(BLO): work only in back loops
(d-dc,dble.b)/ (tr): Double treble crochet
(br)/(dc): treble crochet
(dB)/(hdc): half treble crochet
(sc)/(sl-st): slip stitch, small stitch
(db / dbr) (dtr): Double flange
(mct)/(tch): chain stitches to turn
(3msm)/(sc3tog): 3 sc in the same stitch
(Fo): Stop the thread.
Body
(With alize yarn colors 382 & 062)
Rnd 1: start with color 382 and sc 6 in MR (6)
Rnd 2: 2 sc in each st around (12)
Rnd 3: (sc1, inc to next)* 6 (18)
Rnd 4: (sc2, inc to next)*6 (24)
Rnd 5: sc BLO in all sts around (24)
Rnd 6: switch to color 062 and sc in all sts (24)
Rnd 7: sc BLO in each st around (24)
Rnd 8: 6 sc, dec, 7 sc, dec, 7 sc (22)
Rnd 9: sc in each st around (22)
Rnd 10: dec, 6 sc, dec, 6 sc, dec, 4 sc (19)
Rnd 11: sc in each st around (19)
Rnd 12: 2 sc, dec, 5 sc, dec, 4 sc, dec, 2 sc (16)
Rnd 13: sc in each st around (16)
Rnd 14: (sc ,sun)*4 (12)
Fill with fiberfill using a wooden stick and press down your amigurumi to help shape it.
Concealed closure.
Hold the body upside down and pull up a loop of yarn color alize 062 in the first remaining front loop of round 7 and do; (4 hdc in same stitch; sl st in next)*12
Arm (make 2)
(With alize yarn colors 062 & 056)
Rnd 1: start with color 056 and make sc 6 in MR (6)
Rnd 2-3: (2 rounds): sc in each stitch around (6 )
Rnd 4: sl st in each st around (6)
Rnd 5-9: (5 rounds): change to color 062 and sc in each st around (6)
Fill only the red parts of the hands; invisible zipper leaving a long tail of thread for sewing.
Head
(With alize color 382)
Rnd 1: sc 6 in MR (6)
Rnd 2: 2 sc in each stitch around (12)
Rnd 3: (sc 1, inc to next)*6 (18)
Rnd 4: (sc 2, inc to next)*6 (24)
Rnd 5: (sc 3, inc to next)*6 (30)
Rnd 6-10: (5 rounds): sc in each st around (30)
Rnd 11: (sc 3, dec)*6 (24)
Rnd 12: (sc 2, dec)*6 (18)
Rnd 13: (sc 1, dec)*6 (12)
Fill with fiberfill using a wooden stick and press down your amigurumi to help shape it. Invisible zipper, leaving a long tail of thread for sewing.
Hat
(With alize color 056)
Rnd 1: sc 6 in MR (6)
Rnd 2: sc in each stitch around (6)
Rnd 3: (inc in each stitch around)*6 (12)
Rnd 4: sc in each stitch around each st around (12)
Rnd 5: (sc 1, inc to next)*6 (18)
Rnd 6: sc in each st around (18)
Rnd 7: (sc 2, inc to next)*6 (24)
Rnd 8: sc in each st around (24)
Rnd 9: (sc 3, inc to next)*6 (30)
Rnd 10: sc in each st around (30)
Rnd 11: (sc 4, inc to next)*6 (36)
Rnd 12: sc in each st around (36)
Rnd 13: (sc 5, inc to next)*6 (42)
Rnd 14: sc in each st around (42)
Rnd 15: sl st in each st around ( 42)
Invisible Fo, leaving a long tail of thread for sewing.
Assembly
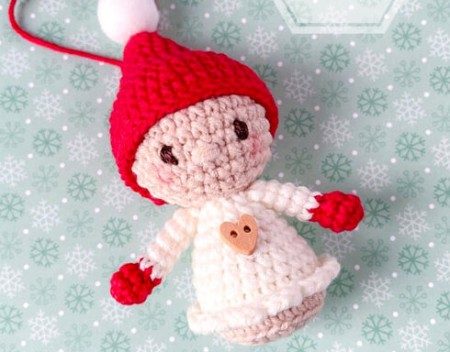
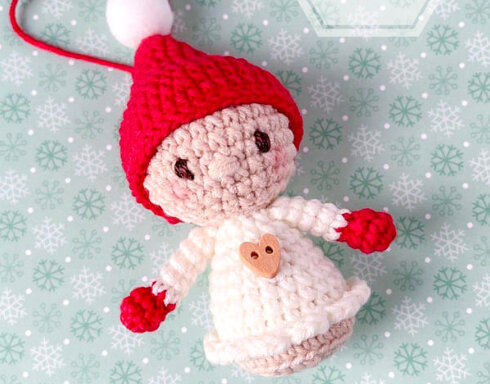
• Sew the body to the head.
• Sew the arms to the body.
• With coffee catane yarn, embroider the eyes on rows 9 and 10 with 5 visible stitches between them.
• With alize thread color 382, embroider the nose on row 10, centered on the eyes.
• Line cheeks with pink blush.
• Sew the hat on the head.
• Glue a pretty heart-shaped button on the doll’s body.
• Glue a mini pompom on the top of the hat.
• Attach a piece of yarn to hang the ornament on the Christmas tree, or attach a string of beads to make a key ring.

