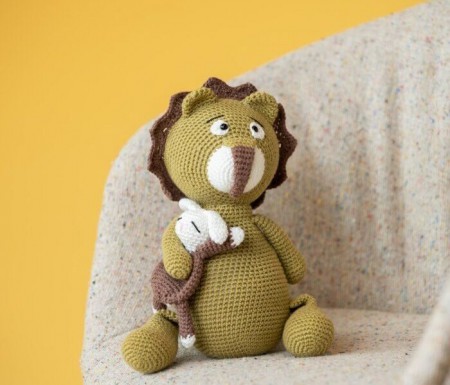
Lion Free Amigurumi Pattern
Hello dear Amigurumi enthusiasts! Today I would like to share with you a free Amigurumi Lion pattern and construction instructions. Amigurumi has become a popular hobby in the world of craftsmanship, and in this article I will present you a great Amigurumi Lion design. Trust your imagination while doing amigurumi. And dare to create your own unique designs. Welcome to the Amigurumi world, enjoy fun handicraft projects.
Skill level: Beginner
Crochet hook: 2.50 mm
Measurements: In sitting position approx. 22 cm; from top to tip of the tale approx.
31 cm
Materials: A small piece of black scrap yarn for the eyebrows, safety eyes 8 mm, fiberfill
Yarn: Rainbow Cotton 8/4
Brown (#007) – 1 skein
Olive (#072) – 2 skeins
Natural White (#002) – 1 skein
Abbreviations:
ch = chain
sc = single crochet
sl st = slip stitch
mr = magic ring
hdc = half double crochet
dc = double crochet
inc = increase – 2 stitches in the same stitch
dec = decrease – 2 stitches together
rnd(s) = round(s)
(xx) = Number of stitches after ended round
Info and tips:
Always stuff the head and body firmly.
Always stuff between head and body as you sew the head on to avoid a wobbly head.
Work tightly to avoid holes between the stitches.
All pieces are worked in a spiral.
Mane
In Brown
Rnd 1: Ch 72, join into a ring with a sl st in the first ch.
Rnd 2: 1 sc in each st (72)
Rnd 3: (skip 2 sc, [2 hdc, 3 dc, 2 hdc] in the same stitch, skip 2 sc, 1 sc) Repeat around until
you have 12 spaces, 1 sl st
Rnd 4: 5 sc, (ch 2 and 1 sc in the same stitch, 8 sc) Repeat around
Fasten off.
The white part around the eye
In Natural White, make 2
Rnd 1: Begin with a mr and work:
1 sc, 2 hdc, 1 dc, 2 hdc, 2 sc, 1 sl st
Fasten off.
Insert the safety eyes in the magic ring
The tip of the snout
Begin with Brown
Rnd 1: 3 sc in a mr
Rnd 2: inc 3 times (6)
Rnds 3-6: 1 sc in each st (6)
Rnd 7: (1 sc, inc) 3 times (9)
Rnds 8-10: 1 sc in each st (9)
Rnd 11: (2 sc, inc) 3 times (12)
Rnds 12-13: 1 sc in each st (12)
Switch to Olive
Rnd 14: 1 sc in each st (12)
Rnd 15: (3 sc, inc) 3 times (15)
Rnd 16: 1 sc in each st (15)
Fasten off.
Arm
In Olive, make 2
Rnd 1: 6 sc in a mr
Rnd 2: (inc) 6 times (12)
Rnd 3: (1 sc, inc) 6 times (18)
Rnds 4 -7: 1 sc in each st (18)
Stuff the hand firmly and the arm lightly as you work.
Rnd 8: dec 5 times, 8 sc (13)
Rnds 9-23: 1 sc in each st (13)
Fasten off.
Legs
In Olive, make 2
Rnd 1: 6 sc in a mr
Rnd 2: inc 6 times (12)
Rnd 3: (1 sc, inc) 6 times (18)
Rnd 4: (2 sc, inc) 6 times (24)
Rnd 5: (3 sc, inc) 6 times (30)
Rnd 6: (4 sc, inc) 6 times (36)
Rnds 7-10: 1 sc in each st (36)
Rnd 11: (dec) 3 times, 30 sc (33)
Rnd 12: (dec) 3 times, 27 sc (30)
Rnd 13: 1 sc in each st (30)
Stuff the foot firmly, don’t stuff the leg.
Rnd 14: dec 3 times, 24 sc (27)
Rnd 15: 1 sc in each st (27)
Rnd 16: (7 sc, dec) 3 times (24)
Rnd 17: (6 sc, dec) 3 times (21)
Rnd 18: 1 sc in each st (21)
Rnd 19: (5 sc, dec) 3 times (18)
Rnds 20-26: 1 sc in each st (18)
Then work 3 sc to finish at the right spot for crocheting the legs onto the body.
Fasten off.
Body
In Olive
Rnd 1: 6 sc in a mr
Rnd 2: inc 6 times (12)
Rnd 3: (1 sc, inc) 6 times (18)
Rnd 4: (2 sc, inc) 6 times (24)
Rnd 5: (3 sc, inc) 6 times (30)
Rnd 6: (4 sc, inc) 6 times (36)
Rnd 7: (5 sc, inc) 6 times (42)
Rnd 8: (6 sc, inc) 6 times (48)
Rnd 9: (7 sc, inc) 6 times (54)
Rnd 10: (8 sc, inc) 6 times (60)
Rnd 11: (9 sc, inc) 6 times (66)
Rnds 12-17: 1 sc in each st (66)
Now you are going to crochet the leg onto the body, and you work through both layers.
Rnd 18: 9 sc with one leg, 27 sc, 9 sc with the other leg, 21 sc (66)
Rnds 19-25: 1 sc in each st (66)
Rnd 26: (9 sc, dec) 6 times (60)
Rnd 27-28: 1 sc in each st (60)
Rnd 29: (8 sc, dec) 6 times (54)
Rnds 30-31: 1 sc in each st (54)
Rnd 32: (7 sc, dec) 6 times (48)
Rnds 33-34: 1 sc in each st (48)
Stuff the body as you work.
Rnd 35: (6 sc, dec) 6 times (42)
Rnds 36-37: 1 sc in each st (42)
Rnd 38: (5 sc, dec) 6 times (36)
Rnd 39: 1 sc in each st (36)
Now you are going to crochet the inner side of the arm onto the body, be careful to make
sure that the hand turns the right way.
Rnd 40: 5 sc, 7 sc with arm, 11 sc, 7 sc with arm, 6 sc (36)
Now you are going to crochet the outer edge of the arm onto the body.
Rnd 41: 5 sc, 6 sc with arm, skip 1 st, 11 sc, 6 sc with arm, skip 1 st, 6 sc (34) See picture
above.
Rnd 42: 1 sc in each st (34)
Rnd 43: (15 sc, dec) 2 times (32)
Rnd 44: 1 sc in each st (32)
Fasten off and leave a tail long enough for assembling
Head
Begin with Natural White
Rnd 1: 6 sc in a mr
Rnd 2: inc 6 times (12)
Rnd 3: (1 sc, inc) 6 times (18)
Rnd 4: (2 sc, inc) 6 times (24)
Rnd 5: (3 sc, inc) 6 times (30)
Rnds 6-10: 1 sc in each st (30)
Switch to Olive
Now you are going to crochet the tip of the snout on.
Rnd 11: 2 sc, inc, 3 sc, together with the snout: 1 sc, inc, 4 sc, after the snout continue with:
inc, 4 sc, inc, 4 sc, inc, 4 sc, inc, 2 sc (36)
Rnd 12: (5 sc, inc) 6 times (42)
Rnd 13: 3 sc, inc (6 sc, inc) 5 times, 3 sc (48)
Rnd 14: (7 sc, inc) 6 times (54)
Rnd 15: 4 sc, inc (8 sc, inc) 5 times, 4 sc (60)
Rnd 16: (9 sc, inc) 6 times (66)
Rnd 17: 5 sc, inc (10 sc, inc) 5 times, 5 sc (72)
Rnds 18-24: 1 sc in each st (72)
Now, attach the safety eyes on the head together with the white part between rounds 14-15
with 7 sc in between.
And then you are going to crochet the mane on on the next round, with 1 sc for each sc.
Remember to have the right sides facing each other when crocheting together.
Rnd 25: together with the mane 1 sc in each st (72)
Rnds 26-29: 1 sc in each st (72) 4 rounds
Rnd 30: (10 sc, dec) repeat 6 times (66)
Rnd 31: (9 sc, dec) repeat 6 times (60)
Rnd 32: (8 sc, dec) repeat 6 times (54)
Rnd 33: (7 sc, dec) repeat 6 times (48)
Rnd 34: (6 sc, dec) repeat 6 times (42)
Rnd 35: (5 sc, dec) repeat 6 times (36)
Stuff the head with fiberfill as you work.
Rnd 36: (4 sc, dec) repeat 6 times (30)
Rnd 37: (3 sc, dec) repeat 6 times (24)
Rnd 38: (2 sc, dec) repeat 6 times (18)
Rnd 39: (1 sc, dec) repeat 6 times (12)
Rnd 40: (2 sc, dec) repeat 3 times (9)
Fasten off and leave a tail long enough for gathering the last 9 stitches. Use a needle to
gather the last 9 front loops and tighten the yarn gently to close the hole nicely.
Ear
In Olive, make 2
Rnd 1: 6 sc in a mr
Rnd 2: inc 6 times (12)
Rnd 3: (1 sc, inc) 6 times (18)
Rnds 4-6: 1 sc in each st (18)
Fasten off and leave a tail long enough for assembling.
Tail
In Brown
Rnd 1: 5 sc in a mr
Rnd 2: inc, 4 sc (6)
Rnd 3: inc, 5 sc (7)
Rnd 4: inc, 6 sc (8)
Rnd 5: inc, 7 sc (9)
Rnd 6: inc, 8 sc (10)
Rnd 7: inc, 9 sc (11)
Rnd 8: inc, 10 sc (12)
Rnd 9: (3 sc, inc) 3 times (15)
Rnd 10: 1 sc in each st (15)
Rnd 11: (3 sc, dec) 3 times (12)
Rnd 12: (2 sc, dec) 3 times (9)
Switch to Olive
Stuff the tip with fiberfill, don’t stuff the rest of the tail.
Rnds 13-27: 1 sc in each st (9)
Fasten off and leave a tail long enough for assembling.
Rabbit comfort cloth
The head and body are crocheted in one piece, begin with the head in Natural White
Rnd 1: 6 sc in a mr
Rnd 2: inc 6 times (12)
Rnd 3: (1 sc, inc) 6 times (18)
Rnd 4: (2 sc, inc) 6 times (24)
Rnds 5-9: 1 sc in each st (24)
Stuff the head as you work.
Rnd 10: (2 sc, dec) 6 times (18)
Rnd 11: (1 sc, dec) 6 times (12)
Rnd 12: (2 sc, dec) 3 times (9)
Rnd 13: 1 sc in each st (9)
Switch to Brown
Rnd 14: inc 9 times (18)
Rnd 15: (2 sc, inc) 6 times (24)
Rnd 16: (3 sc, inc) 6 times (30)
Rnds 17-25: 1 sc in each st (30)
Rnd 26: (3 sc, dec) 6 times (24)
Rnd 27: (2 sc, dec) 6 times (18)
Rnd 28: (1 sc, dec) 6 times (12)
Rnd 29: (2 sc, dec) 3 times (9)
Fasten off and leave a tail long enough for gathering the last 9 stitches. Use a needle to
gather the last 9 front loops and tighten the yarn gently to close the hole nicely.
Legs and arms
Begin with Natural White, make 4
Rnd 1: 6 sc in a mr
Rnd 2: (1 sc, inc) 3 times (9)
Rnd 3: 1 sc in each st (9)
Switch to Brown
Rnds 4-12: 1 sc in each st (9)
Fasten off and leave a tail long enough for sewing.
Tail
In Natural White
Rnd 1: 6 sc in a mr
Rnd 2: inc 6 times (12)
Rnds 3-5: 1 sc in each st (12)
Stuff the tail a bit.
Rnd 6: (2 sc, dec) 3 times (9)
Fasten off and leave a tail long enough for assembling.
Rabbit’s ear
In Natural White, make 2
Rnd 1: 6 sc in a mr
Rnd 2: (1 sc, inc) 3 times (9)
Rnds 3-6: 1 sc in each st (9)
Rnd 7: (1 sc, dec) 3 times (6)
Rnds 8-9: 1 sc in each st (6)
Crochet the opening closed with 2 sc.
Assembling of the Rabbit comfort cloth
· Sew the ears onto the head on round 2
· Sew the arms on on round 14
· Sew the legs on on round 26
· Sew the tail on in the middle of the back side
· Embroider the eyes diagonally from round 5-7
· Embroider the snout
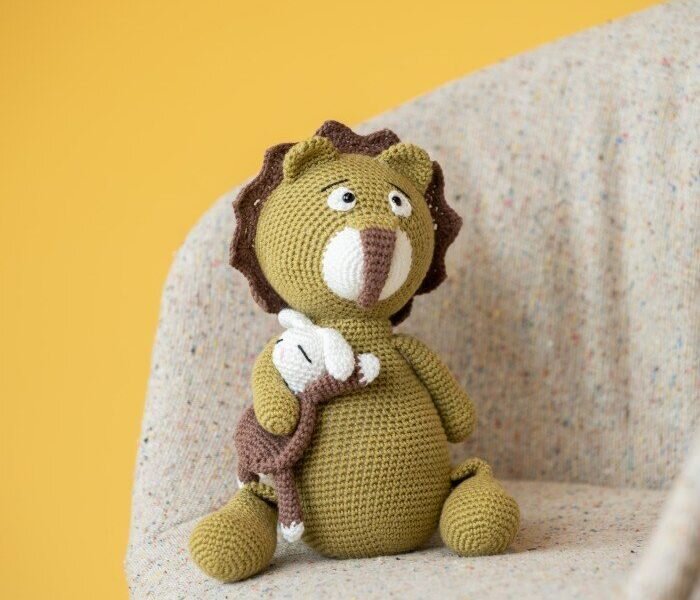
Assembling of Lennon the Lion
· Embroider eyebrows between rounds 17-18 across 5 sc
· Sew the tip of the upper snout on, underneath at the natural white snout
· Sew the head onto the body
· Sew the ears on on round 23
· Sew the tail on on round 13 in the middle of the back side of the body
It's All Finished:


