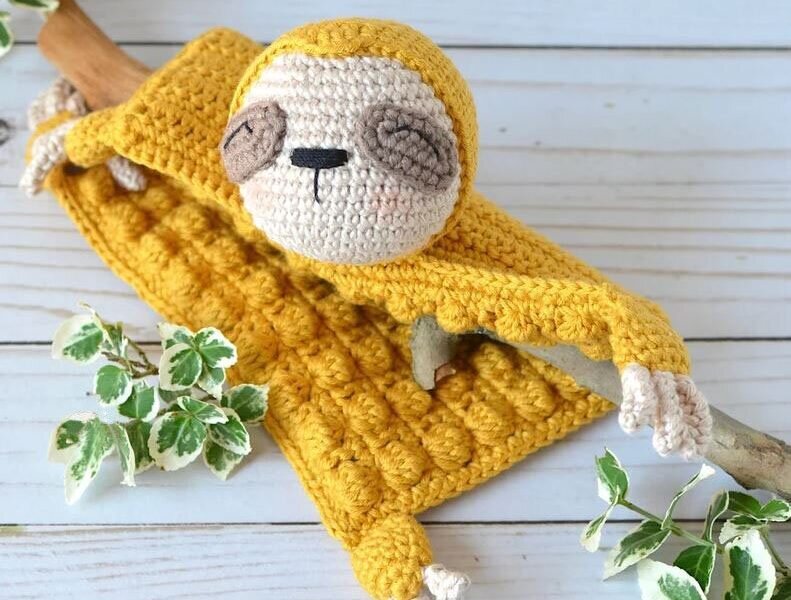
Sloth Security Blanket Free Pattern
Hello dear Amigurumi enthusiasts! Today I would like to share with you a free Amigurumi Free Pattern pattern and construction instructions. Amigurumi has become a popular hobby in the world of craftsmanship, and in this article I will present you a great Amigurumi Free Pattern design. Trust your imagination while doing amigurumi. And dare to create your own unique designs. Welcome to the Amigurumi world, enjoy fun handicraft projects.
YARN: Light (3) – Yellow, Beige, Brown; Cotton Thread in Black
MATERIALS: 3.25 mm / 2.5 mm Crochet Hooks; Poly Filling; Yarn Needle
DIMENSION: 9.5” x 8”
ABBREVIATIONS: magic ring (mr), stitch (st), slip stitch (sl st), single crochet (sc),
half double crochet (hdc), double crochet (dc), bobble stitch (dc6tog), fasten off (F/O) SKILL LEVEL: Intermediate BOBBLE STITCH: Work each st to the last loop but leave the last loop on the hook while you are working the rest of the stitches in the bobble. Then, yarn over and draw a loop through all the loops on the hook to complete the stitch.
BLANKET PANEL A (yellow yarn; work in rows; 3.25 mm hook)
Row 1: 38 ch, 1 sc into the 2nd ch from the hook, 36 sc (37); ch 2 and turn
Row 2: 1 dc into the 1st st, 1 ch, skip one st, (1 dc6tog, ch 1, skip 1 st, work 1 dc into the next st) rep 9 times (19 sts, 9 chs); ch 1 and turn
Row 3: 1 sc into the dc st, (1 sc into the space between the dc and the bobble st, 1 sc into the bobble st, 1 sc into the ch space, 1 sc into the dc st) rep 9 times (37); ch 2 and turn
Rows 4 – 23: rep rows 2-3; F/O and cut the yarn
BLANKET PANEL B (yellow yarn; work in rows; 3.25 mm hook)
Row 1: 38 ch, 1 sc into the 2nd ch from the hook, 36 sc (37); ch 2 and turn
Row 2: dc even (37); ch 1 and turn
Row 3: sc even (37); ch 2 and turn
Rows 4 – 23: rep rows 2-3
DO NOT F/O or cut the yarn.
Place the two panels together, matching up all sides and making sure the right side of the bobble panel is facing outwards. Start joining the panels by crocheting the edges together with single crochet stitches.
Work 3 sc stitches in each corner. F/O, cut the yarn and wave in end.
HEAD (beige and yellow yarn; 3.25 mm hook)
Rnd 1: starting off with beige yarn, 7 sc in a mr (7)
Rnd 2: sc inc around (14)
Rnd 3: (1 sc, 1 sc inc) rep around (21)
Rnd 4: (2 sc, 1 sc inc) rep around (28)
Rnd 5: (3 sc, 1 sc inc) rep around (35)
Rnd 6: (4 sc, 1 sc inc) rep around (42)
Rnd 7 – 15: sc even (42); start stuffing the head
Rnd 16: (4 sc, 1 sc dec) rep around (35)
Rnd 17: (3 sc, 1 sc dec) rep around (28)
Rnd 18: (2 sc, 1 sc dec) rep around (21)
Rnd 19: (1 sc, 1 sc dec) rep around (14); finish stuffing the head
Rnd 20: sc dec even (7)
F/O, close the hole and wave in end.
Rnd 1: starting off with yellow yarn, 8 sc in a mr (8)
Rnd 2: sc inc around (16)
Rnd 3: (1 sc, 1 sc inc) rep around (24)
Rnd 4: (2 sc, 1 sc inc) rep around (32)
Rnd 5: (3 sc, 1 sc inc) rep around (40)
Rnd 6: (4 sc, 1 sc inc) rep around (48)
Rnd 7 – 11: sc even (48)
Rnd 12: 21 sc, 6 hdc, 21 sc (48)
Rnd 13: 22 sc, 4 hdc, 22 sc (48)
Rnd 14: 23 sc, 1 hdc and 1 dc into the next st, 1 dc and 1 hdc into the next one, 23 sc (50)
F/O and leave a long string of yarn.
Insert the round beige part into the yellow one and secure them in place with the yellow strand.
EYE MARKS (brown yarn; make two; 2.5 mm hook)
Rnd 1: 7 ch, 2 sc into the 2nd ch from the hook, 4 sc, 2 sc inc into the last ch, keep working on the other side of the foundation ch, 4 sc, 1 sc inc into the last ch that already contains 2 sc (16)
Rnd 2: 1 sc inc, 6 sc, 2 sc inc, 6 sc, 1 sc inc (20)
F/O and leave a long strand of yarn to sew the eye marks to the head.
Embroider the EYES with black cotton thread as shown in the picture.
Embroider the NOSE in between the eyes with black cotton thread.
Apply some pink make-up blush to give color to the CHEEKS.
Attach the sloth’s head to one side of the blanket using some yellow yarn.
LIMBS (yellow yarn; make 4; 3.25 mm hook)
Rnd 1: 6 sc in a mr (6)
Rnd 2: sc inc around (12)
Rnd 3 – 5: sc even (12)
Rnd 6: (1 sc, 1 sc dec) rep around (8); stuff the limb lightly
Rnd 7: flatten the limb and work through both layers, 4 sc (4)
F/O and leave a long strand of yarn to attach the limb to one corner of the blanket.
NAILS (beige yarn; make 12; 3.25 mm hook)
Rnd 1: 6 ch, 1 sc into the 2nd ch from the hook, 4 sc (5); ch1 and turn
Rnd 2: 5 sc (5); F/O and leave a long strand of yarn
Fold the crocheted piece in half and sew the 1st and 2nd rows close together. Use the extra length of yarn to attach the nail to the tip of the limb. Attach 3 nails for each limb.
It's All Finished:


